
How to Maintain an Irrigation Valve Box the Right Way

Irrigation valve box maintenance is the routine process of inspecting, cleaning, and protecting the underground enclosure that houses your sprinkler system’s control valves, wiring, and solenoids, and it’s one of the most overlooked tasks in keeping a sprinkler system healthy.
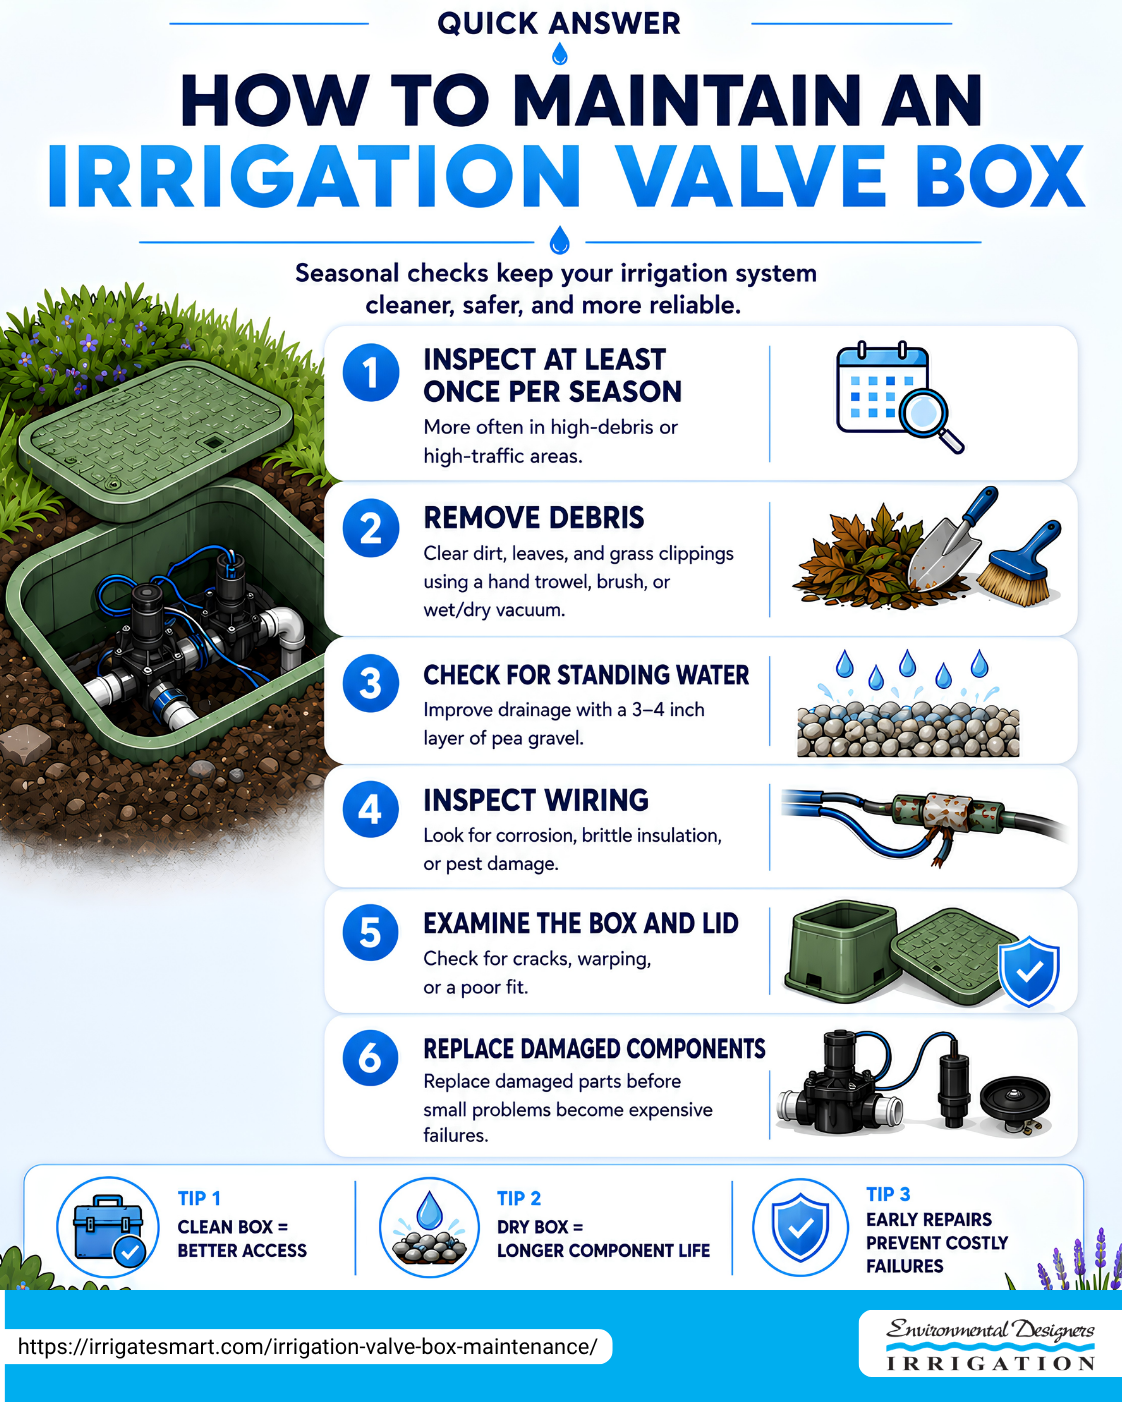
Quick answer: How to maintain an irrigation valve box
- Inspect at least once per season (more often in high-debris or high-traffic areas)
- Remove debris — dirt, leaves, grass clippings using a hand trowel, brush, or wet/dry vacuum
- Check for standing water and improve drainage with a 3–4 inch layer of pea gravel
- Inspect wiring for corrosion, brittle insulation, or pest damage
- Examine the box and lid for cracks, warping, or a poor fit
- Replace damaged components before small problems become expensive failures
Most New Jersey homeowners know where their sprinkler controller is. Far fewer know where their valve boxes are, let alone what’s inside them — and that gap is where trouble starts.
Your valve box is buried just below the surface of your lawn. It quietly protects the valves that control water flow to every zone in your system. When it’s ignored, problems stack up quickly: water pools inside, soil fills the cavity, roots push through the walls, fire ants nest in the warm wiring, and corroded connections make zones behave erratically.
By the time you notice something is wrong- a zone that won’t shut off, soggy patches across your lawn, or a water bill that’s quietly climbing- the damage is often already done. What started as a debris problem can turn into a full excavation job. Almost all of it is preventable with simple, consistent maintenance.
This guide covers clearing debris, dealing with mud buildup, testing solenoids, and setting up a pea gravel base inside the valve box. For main line pressure testing, backflow compliance, or pipe repairs, read our guide on evaluating sprinkler system repairs and component upgrades. For seasonal line purging, blowouts, and freeze protection, see our irrigation seasonal maintenance and system care options.
Why Proactive Irrigation Valve Box Maintenance Prevents System Failure
Ignoring what’s under your turf lets small problems compound out of sight. Proactive irrigation valve box maintenance keeps your system running efficiently, holds down water waste, and stops minor mechanical problems from turning into expensive property damage.
The box is the only thing protecting the valves and wiring inside it. Let it fail and every component is exposed. Regular inspections help you avoid the financial toll of Deferred Irrigation Maintenance.
In short, keeping this box clear is the single best way to make sure that when a valve needs a quick fix, your technician can find it, reach it, and repair it without needing a backhoe.
Common Problems Inside the Valve Box
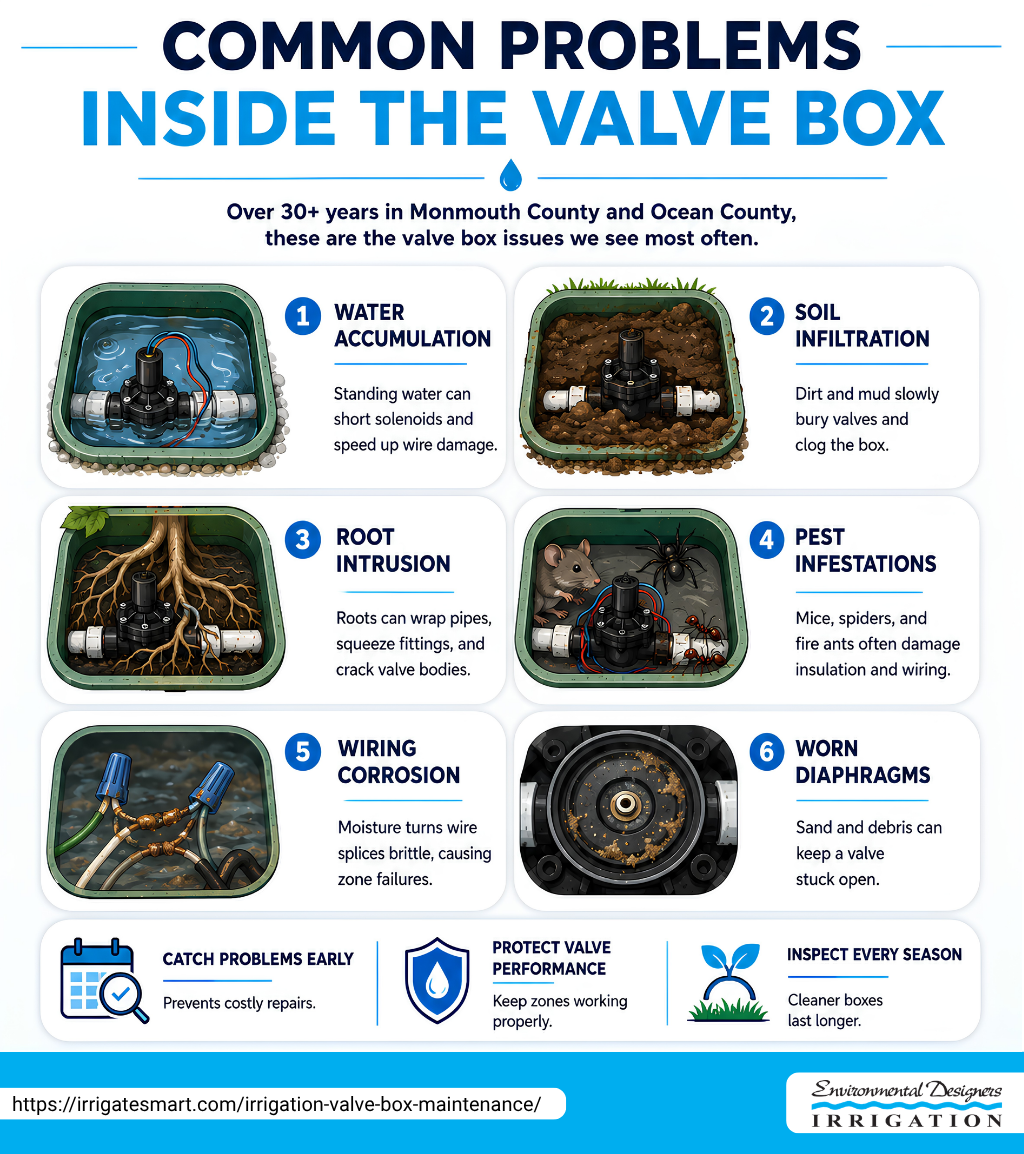
Over our 30+ years servicing systems in Monmouth County and Ocean County, we have seen some truly wild things inside neglected valve boxes. Here are the most common culprits that threaten your system:
- Water Accumulation: Poor drainage or high water tables can submerge your valves. If you have clay-heavy soil, water pools inside the box, causing solenoids to short out and wires to degrade.
- Soil Infiltration: Dirt slowly creeps in through the bottom of the box or around the pipe entry points. Eventually, the valves are completely buried in mud.
- Root Intrusion: Hungry tree and shrub roots love the moist environment inside a valve box. They will wrap around pipes, squeeze fittings, and can easily crack the plastic valve bodies.
- Pest Infestations: Mice, spiders, and especially fire ants love the warm, dry microclimate of a covered box. Fire ants are notorious for chewing through wire insulation, causing mysterious electrical failures.
- Wiring Corrosion: Constant moisture turns standard wire splices into corroded, brittle messes, leading to intermittent zone failures.
- Worn Diaphragms: Small pieces of sand or rock can get wedged in the valve’s internal rubber diaphragm, keeping the valve stuck open. If you notice a zone that won’t turn off, you likely need to clear debris from the valve. Manufacturers like Rain Bird and Hunter both publish diaphragm-cleaning steps for their valve models — for example, Hunter’s Cleaning Debris from an Irrigation Valve guide.
Should You Handle This Yourself or Hire It Out?
Valve box upkeep is well within reach for a hands-on homeowner, but a full-property system with a dozen boxes, aging solenoids, or two-wire wiring is worth a professional eye. How you structure that service matters — the tradeoffs between flat-rate and time-and-material agreements are covered on our Lawn Irrigation Maintenance Contracts page, and our Yearly Irrigation Service Contract lays out what a scheduled plan includes.
Step-by-Step Guide to Cleaning and Protecting Your Irrigation System
Regularly cleaning and maintaining your valve boxes is a task that pays dividends. If you prefer to leave the dirty work to certified professionals, our team offers comprehensive water-management services to keep your system running flawlessly. But if you are a hands-on property owner, here is how you can tackle this job safely and effectively.
Essential Tools for Irrigation Valve Box Maintenance
Don’t go poking around in a muddy valve box with a sharp metal shovel; you risk slicing through low-voltage wires or cracking a PVC manifold. Instead, assemble these specialized, safe tools:
- Hand Pump: A manual siphon pump (like a 36-inch Beckson pump, typically around $45) is perfect for bailing out standing water without risking electrical shock.
- Wet/Dry Vacuum: A battery-powered portable vacuum (like a Dewalt 18V or 20V) pulls out dry dirt, loose sand, and small leaves far faster than clearing them by hand.
- High-Pressure Hose with Spray Nozzle: Essential for spraying down dirty valves and creating a “mud slurry” that you can easily pump or vacuum out.
- Safety Gear: Heavy-duty work gloves (to protect against spiders, stinging insects, and sharp plastic rims) and safety glasses.
How to Safely Clean and Inspect Your Valves
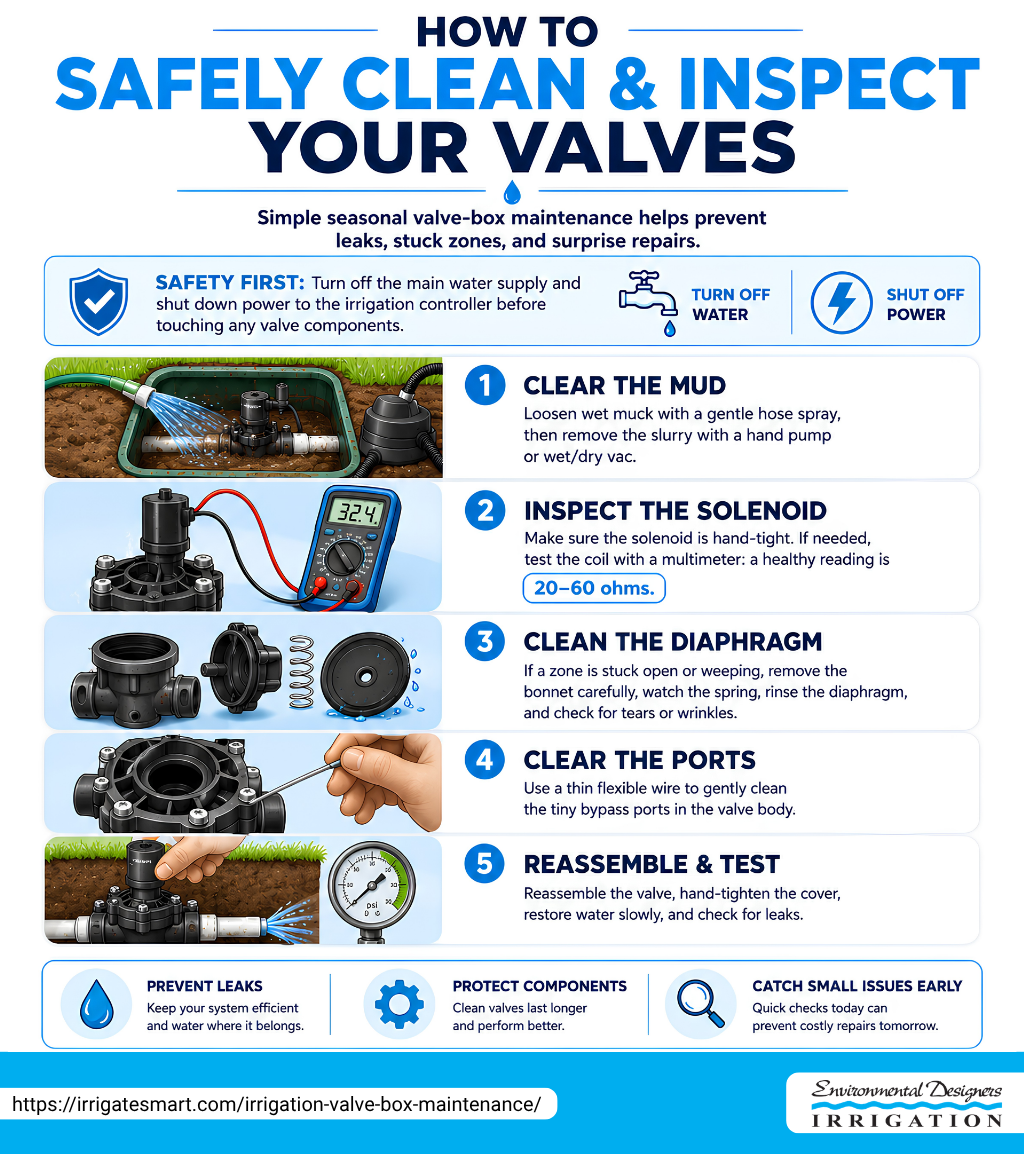
Before you touch a single valve component, turn off the main water supply and shut down the power to your irrigation controller. Working on a pressurized valve is a recipe for a cold, high-pressure shower and lost parts.
- Clear the Mud: If the box is filled with wet muck, blast it gently with your hose to create a slurry, then use your hand pump or wet/dry vac to extract the liquid mud.
- Inspect the Solenoid: Gently twist the solenoid (the cylindrical component with two wires) so it sits hand-tight. If you suspect an electrical issue, use a multimeter to check the coil resistance; a healthy solenoid should read between 20 and 60 ohms, though the exact range varies by brand and model.
- Clean the Diaphragm: If a zone is weeping or stuck open, carefully unscrew the valve bonnet (top cover). Keep a close eye on the internal spring so it doesn’t launch into the grass! Remove the rubber diaphragm, rinse it thoroughly in clean water to wash away sand, and inspect it for tears or wrinkles. The bonnet-and-diaphragm process is similar across Rain Bird and Hunter valve bodies; for a visual walkthrough, watch How to Repair the Top of a Hunter Valve.
- Clear the Ports: Use a flexible thin wire to gently clear the tiny internal bypass ports in the valve body.
- Reassemble and Pressure Test: Reassemble the valve, hand-tightening the screws or jar-top ring. Turn the water supply back on slowly and check for leaks.
Choosing and Installing the Right Replacement Cover
Lids get cracked by lawnmowers, warped by the New Jersey summer sun, or simply lost. If your cover is damaged, it must be replaced immediately to prevent tripping hazards and stop debris from filling the box.
When sourcing a replacement, measure the external dimensions of the box opening, not the old lid itself, as plastic rims can warp over time. Valve boxes range from small round boxes (for single valves) to jumbo rectangular boxes. A standard residential rectangular box runs roughly 14″ x 19″ and about 12″ deep. Sizes vary by brand, so confirm the model’s spec sheet before ordering.
Always choose high-density polyethylene (HDPE) over standard polypropylene (PP); HDPE offers vastly superior UV protection and impact resistance. If your box is near a driveway or high-traffic area, opt for a heavy-duty composite or steel box enclosure to prevent cracking and deter vandals. Also, keep color coding in mind: use green lids for standard turf, and purple covers if your community uses non-potable or reclaimed water. To ensure a perfect, flush-to-grade fit, follow the steps in How to Replace an Irrigation Valve Box Cover, a guide by Engineer Fix.
Long-Term Prevention and Seasonal Irrigation Valve Box Maintenance
The secret to minimizing your maintenance workload is proper site preparation. Line the bottom of your excavated valve box hole with professional-grade landscape fabric to prevent soil from pumping up from below. Then, add a 3-to-4-inch layer of clean pea gravel. This gravel bed keeps your valves out of the mud, discourages pests, and allows any water that enters the box to drain away quickly.

Because New Jersey climates experience harsh winter freezes and hot, humid summers, your maintenance checklist must change with the seasons.
| Season | Key Maintenance Tasks |
|---|---|
| Spring Startup | Open boxes, clear winter debris, check wire connections, manually cycle valves to clear sediment. |
| Mid-Season Check | Inspect for standing water, check for pest nests (ants/wasps), trim back encroaching grass or roots. |
| Autumn/Winterization | Blow out water from the lines with compressed air to prevent freeze-cracking, secure lids tightly. |
Key Takeaways: Valve Box Maintenance
- Debris Causes Mechanical Strain: Soil accumulation, organic muck, and root intrusion inside unmaintained boxes compress manifolds and wedge sand into internal rubber diaphragms, leaving zones stuck open.
- Standing Water Shorts Solenoids: Clay-heavy soils retain moisture that submerges low-voltage components, accelerating wire corrosion and inducing unexplained zone tracking failures.
- A Gravel Base Improves Drainage: Landscape fabric topped with a three-to-four-inch clean pea gravel bed prevents soil from pumping up into the box and discourages insects from nesting near the wiring.
- Material Choices Prevent Structural Failure: High-density polyethylene (HDPE) lids provide crucial UV and impact resistance against heavy commercial lawnmowers compared to brittle polypropylene alternatives.
- Neglected Boxes Fail Where You Can’t See: A box left unopened for years is where standing water, root intrusion, and corrosion do their damage — routine access is the cheapest insurance against a zone failure.
Ignoring buried valve enclosures can lead to hidden zone weeping, electrical shorts, and escalating water overhead beneath your turf. To see how professional zone mapping, clean gravel bedding, and solenoid diagnostics isolate mechanical issues before they damage your lawn, consider reviewing your layout with our irrigation maintenance experts. If you need to resolve an active zone leak or schedule a comprehensive multi-point inspection for a commercial or residential property, please contact our service team directly to coordinate a precise field assessment.

Recent Posts
Why Sprinkler Wire Splices Fail Underground: And How to Fix It
Gov. Murphy Signs Irrigation Enforcement Bill: What NJ Homeowners Should Know